· ARUM Team · LED Knowledge
Complete LED Power Supply Guide — Everything You Need to Know Before Buying
The complete guide to LED power supplies — from basic concepts and types to calculations, installation, and maintenance. For both DIYers and professional installers.
The power supply (PSU) is the heart of every DC LED strip system. Choose the wrong one and the entire installation may fail or underperform. This guide covers everything from the basics through calculation, purchasing, installation, and long-term maintenance.
The Basics
An LED power supply (also called LED driver, transformer, or AC adapter) does three things:
- Converts AC 220V from your wall outlet into stable DC voltage (12V or 24V)
- Regulates current to keep it consistent so LEDs don’t overheat
- Protects against surges (voltage spikes) and overloads
Unlike a computer power supply, LED PSUs are optimized for quiet operation, sustained high-temperature performance, and often carry an IP rating for damp locations.
Key Parameters
- Input Voltage — In Thailand, must accept AC 220–240V at 50Hz
- Output Voltage — 12V or 24V DC (must match your LED strip)
- Output Current (A) — Maximum current the PSU can supply
- Output Power (W) — Total capacity = V × A, e.g., 24V × 10A = 240W
- Efficiency — How well it converts power; typically 85–93%
- IP Rating — IP20 for indoor use, IP67 for outdoor/wet locations
Types of LED Power Supplies
By Output Type
Constant Voltage (CV) — Fixed output voltage (12V or 24V). This is what virtually all standard LED strips use. If your strip is rated for 24V DC, use a 24V CV power supply.
Constant Current (CC) — Fixed output current. Used for specific high-power LED modules and some specialty drivers. Not typical for general LED strips.
For the vast majority of LED strip installations, Constant Voltage is the right choice.
By Form Factor
- Adapter — Small plug-in type, 12–60W range
- Open Frame — Bare PCB, 50–300W, must be enclosed
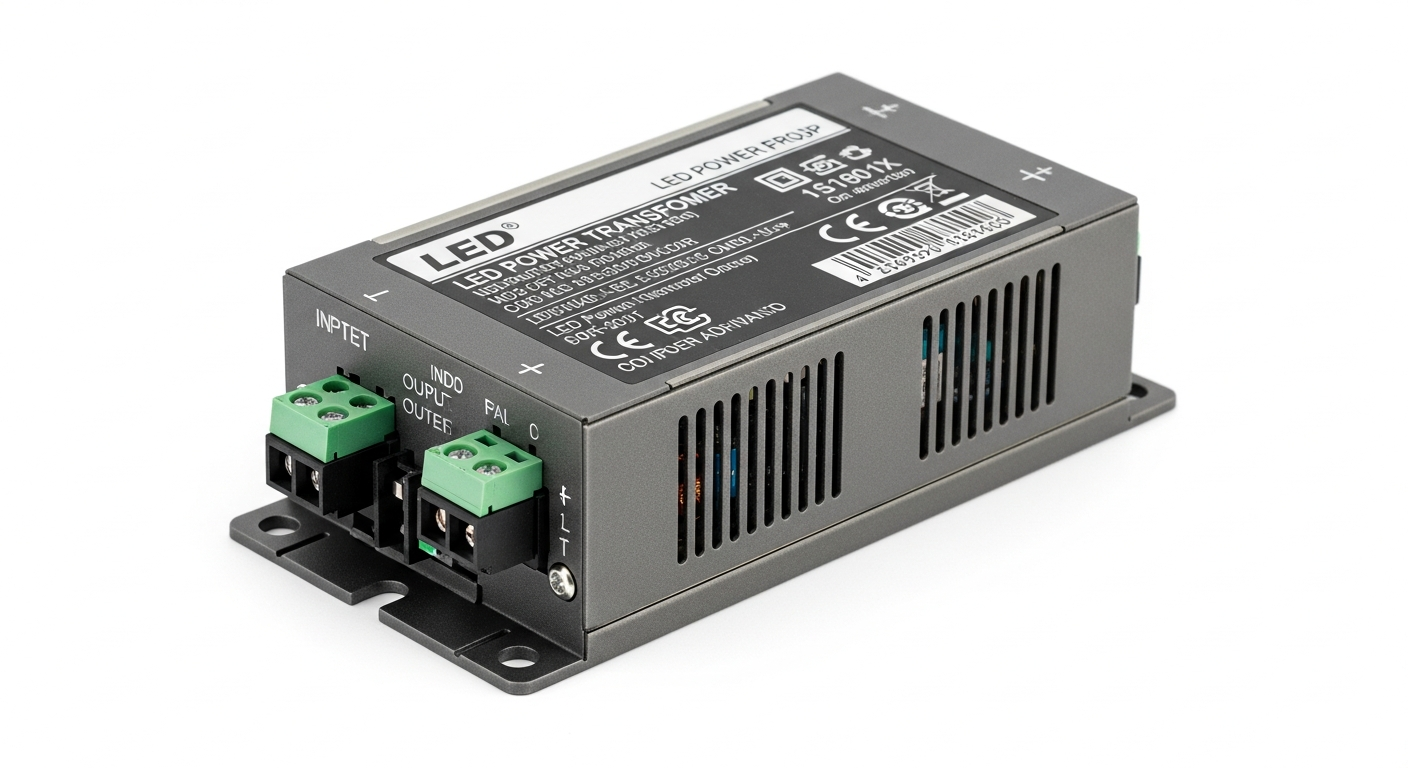
- Enclosed — Metal box, 60–600W, most common type for general use
- IP67 Sealed — Weatherproof, 60–400W, for outdoor installation
- Slim LED Driver — Very thin profile, 60–200W, hides inside coves and false ceilings
By Quality Grade
Generic OEM (no brand) — Cheap, lifespan 1–2 years, acceptable for temporary or test setups only
Mid-range branded (e.g., Arum, Salon) — Good quality, 5–7 year lifespan, suitable for home use
Premium industrial (Meanwell, Tridonic, Philips) — Built for 24/7 operation, 10+ year lifespan, MTBF over 50,000 hours
How to Calculate the Right Power Supply
Standard formula:
PSU Wattage = (Strip W/m × Total Length in meters) × 1.25The 1.25 multiplier represents a 25% safety margin — industry standard for professional installers. Reasons to include it:
- A PSU running at 80% capacity runs cooler and lasts significantly longer than at 100%
- Real-world efficiency is 85–93%, not 100%
- Inrush current at startup can be 1.5–2× the steady-state draw
- Leaves room for system expansion later
For 24/7 operation (retail signage, commercial), use 1.4 multiplier (40% headroom) instead.
Worked Examples
Living room cove lighting:
- COB 24V strip: 12W/m × 8m = 96W
- With 25% margin: 96 × 1.25 = 120W
- Choose: PSU 24V 150W (next standard size up)
Under-cabinet kitchen lighting:
- SMD 5050 12V: 14.4W/m × 3m = 43.2W
- With 25% margin: 43.2 × 1.25 = 54W
- Choose: PSU 12V 60W (an adapter works here)
Commercial retail — 30m run, 24/7:
- COB 24V: 15W/m × 30m = 450W
- With 40% margin: 450 × 1.4 = 630W
- Choose: Two PSU 24V 350W (split the load) or a single 650W unit
Buying Guide
Prioritize these factors in order:
- Correct voltage (12V↔12V, 24V↔24V) — Wrong voltage destroys the strip immediately
- Wattage with 25% headroom — Never buy exactly the load, always over-size
- Trusted brand — Cheap PSU saved ฿100 but risks a ฿10,000 strip failure
- IP Rating — Match the environment
- Warranty — Minimum 2 years
- Ripple voltage — ≤120mV to prevent visible flicker
- Thermal protection — Auto-shutoff when overheated
Signs of a low-quality PSU:
- Unusually light weight (quality units are heavier due to transformer and capacitors)
- No brand, no serial number
- Price seems too low for the stated wattage
- No safety certifications (CE, FCC, RoHS)
Installation Steps
Step 1: Choose location — Good airflow required; never inside a sealed enclosure; avoid high-humidity areas (unless using IP67)
Step 2: Cut main power — Turn off the circuit breaker before any wiring
Step 3: Connect AC input — L (brown/black), N (blue), G (green-yellow) following standard color codes
Step 4: Connect DC output — Red (+), Black (−); never reverse polarity
Step 5: Measure output voltage — Before connecting to LEDs, verify with a multimeter that the PSU is delivering 12V or 24V as expected
Step 6: Connect to LED strip — Match + and − markings on the strip
Step 7: Test — Run for 30 minutes, then check temperature. PSU surface should not exceed 60°C.
Maintenance
A well-maintained PSU can last 10+ years:
- Check temperature periodically — if it’s too hot to touch, something is wrong
- Clean ventilation fins annually — dust buildup causes overheating and efficiency loss
- Listen for unusual sounds — whining or crackling indicates failing capacitors
- Don’t let it get wet — even IP67 units shouldn’t be permanently submerged
- Don’t run above 80% load for 24/7 use — high temperatures shorten lifespan dramatically
- Replace when you see: unstable voltage output, swollen capacitors, burning smell, unusual noise
Summary
The power supply is the heart of the system. Choose it correctly — matching voltage, sizing with a 25% buffer, and buying a quality brand — and it will outlast most of the LEDs it powers. Contact Arumstores for Meanwell and Arum-brand power supplies with expert advice on sizing. View all products.